Download the correct package
Start from the Ryubing Canary release source and choose the build for your operating system. Do not use repacked installers or pages that bundle copyrighted files.
Setup guide
Follow a safe first-time setup path for Ryujinx Canary, from downloading the right package to adding legally dumped keys, firmware and game folders.
$ channel: canary
$ platforms: windows linux macos
$ source: ryubing releases
$ status: verify before download
Independent guide. No keys, firmware, ROMs, DLC or game files are hosted here.
These links point to verified Ryubing Canary release assets checked during implementation.
Start from the Ryubing Canary release source and choose the build for your operating system. Do not use repacked installers or pages that bundle copyrighted files.
Extract Ryujinx Canary into a normal user folder. Avoid protected folders if Windows permission warnings or administrator messages appear.
Open the emulator once so it can create its user folders. This makes it easier to locate the system folder for setup files.
Open the Ryujinx folder from the application menu and place legally dumped prod.keys in the system folder. Restart after adding keys.
Use the Tools menu to install firmware from a legally dumped XCI or ZIP source. Restart the emulator after firmware installation.
Add the folder containing your legally dumped games from settings, then test one title before changing advanced graphics or input settings.
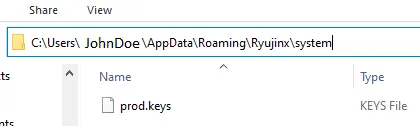
This screenshot from the Ryujinx setup documentation shows the intended system folder location for legally dumped prod.keys. It is included as placement context only; this site does not provide keys or firmware downloads.
Source: Ryujinx setup guideAfter Ryujinx Canary launches correctly, configure controller input, graphics backend and audio settings one at a time. Canary builds can change quickly, so avoid changing many settings at once while troubleshooting.
Before updating, keep a copy of your current build and user data. If the newest Canary build crashes, returning to the previous archive can confirm whether the issue is a regression.
First launch creates user folders and reduces path confusion. Instead of telling users to guess hidden directories, the install page should tell them to open the Ryujinx folder from inside the application. This improves setup accuracy and helps prevent support issues around misplaced prod.keys or firmware files.
New users often change graphics, audio and input options before confirming a clean launch. A better install flow is to complete keys, firmware and game directory setup first, test one legally dumped title, then adjust graphics backend, resolution, controller mappings and audio settings one at a time.
First-time users should keep the setup simple: download the correct package, extract it, launch once, add legally dumped keys, install legally dumped firmware, then add the game directory. Do not start by changing advanced graphics or input settings. A clean baseline makes it easier to identify whether later problems come from the emulator build, the system driver, the setup files or a specific game.
Ryujinx Canary is commonly handled as an extracted folder rather than a traditional installer. That makes rollback easier because you can keep several builds side by side. A portable-style folder also helps when testing whether a crash is tied to a specific Canary version. The tradeoff is that users must be disciplined about where they extract files and which shortcut points to which build.
A clean install is not validated just because the window opens. Confirm that Ryujinx Canary can detect keys, install firmware without errors, list your game directory, and start one legally dumped title. If any step fails, fix that layer first. This order prevents users from wasting time on performance tuning when the real issue is missing keys, outdated firmware or a wrong folder path.
Use these references to verify release status, setup expectations and troubleshooting details before publishing download guidance.
The emulator can launch without them, but compatible game setup requires legally dumped keys and firmware from your own Nintendo Switch.
Use a normal user folder such as Downloads, Documents or a dedicated Games/Emulators folder. Avoid protected locations if permission errors appear.
It is safer to extract the new build to a separate folder first, verify that it works, then remove the older build later.
Running as administrator can create permission and file ownership issues. Launch it as a normal user unless project documentation says otherwise.
Yes, many users keep separate extracted folders for Stable and Canary. Keep track of which shortcut launches which build, and avoid deleting working folders until the new build is tested.
Back up saves, configuration and any folder that stores user data. Also keep a copy of the previous emulator archive if you are testing a new Canary build.
First launch creates the expected user folders. Opening the Ryujinx folder from the app is safer than guessing the path manually.